PAPERLESS CONSTRUCT
  • Home
  • Need
  • 3-Steps
    • 1 - Stop Producing
    • 2 - Stop Receiving
    • 3 - Stop Collecting
  • Tech Tips
  • About
    • My Resources

Tech Tips

Get Better EveryDay

Tech Tip Tuesday - Bluebeam - Be Iconic: Markup with Icons

12/26/2017

0 Comments

 
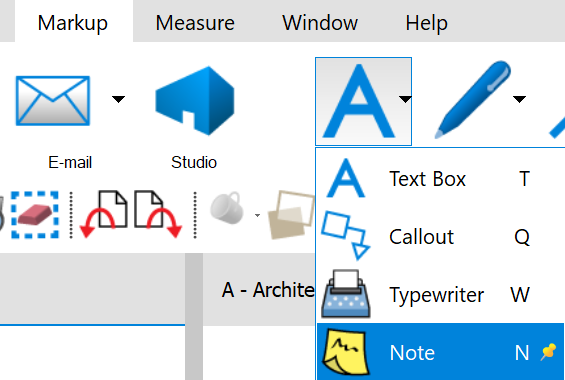
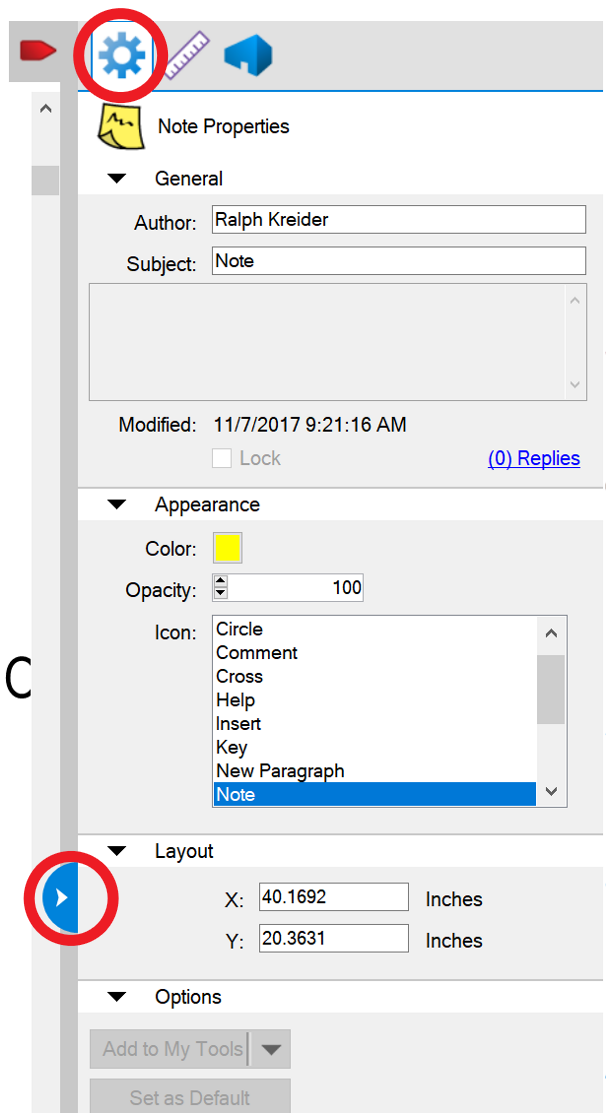
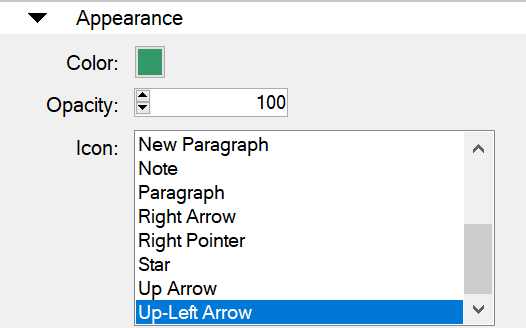
If you are like me, after you are finished marking up a set of drawings, it's difficult to tell which side is up because page is just covered. What I have found though is using the Note (N) markup tool with its collapsible comments really helps. And so that every single markup doesn't look the same, I recommend changing the icon and color. I encourage you to come up with a standard legend for what each icon means  for your team. This standard icon list can then be saved as tool set to be shared with other team members. Find out more details on the Note (N) markup tool below.
 
Be Iconic,
Ralph

Create a Note:

  • Select the "Markup" tab -> "Text" -> "Note" (N)
    • The note tool is also likely in a toolbar or can be easily accessed by pressing "N" on your keyboard.
Picture

Customize your icon and color:

  • Place a note markup on a document and open the "properties" tab
    • Click the right drawer handle and the gear at the top.​
Picture
  • Select the appropriate color and icon for that markup under appearance
    • For icons, choose from: checkmark, circle, comment, cross, help, insert, key, new paragraph, note, paragraph, right arrow, right pointer, star, up arrow, or up-left arrow. (Try them all out)
    • As for color, any color in the rainbow could work
Picture

Save for later:

  • Once you have selected a color and icon to save to the tool to use again, at the bottom of the markup properties, select "Add to My tools" or select the down arrow and a tool set.
Picture

Create a new tool set:

  • If you would like to create a tool set specifically for icons, click on "settings" under your tool chest.
Picture
  • Select "Add" at the bottom of "Manage Tool Sets"
  • Enter a tool set name under "Title" such as "Icons"
  • Select "OK"
  • Select "Save" (Note after the icon list is populated this file can be shared with others to share the some icons. So take note of the save location.)
  • Select "OK" (A new tool set will now exist, under which new icons can now be save using the step method above.)
​
0 Comments


Leave a Reply.

    Author

    Ralph Kreider strives to help make the construction industry more effective.

    Archives

    June 2018
    May 2018
    April 2018
    March 2018
    February 2018
    January 2018
    December 2017
    November 2017
    October 2017
    July 2017
    June 2017

    Categories

    All
    Bluebeam
    Excel
    Outlook
    Skype For Business
    Windows
    Word

    RSS Feed

    View my profile on LinkedIn
  • Home
  • Need
  • 3-Steps
    • 1 - Stop Producing
    • 2 - Stop Receiving
    • 3 - Stop Collecting
  • Tech Tips
  • About
    • My Resources